


Using Soviet parts to fix or upgrade modern electronics is a widespread practice today, since many of those parts often have high quality or offer good characteristics for a fair price. One of the coolest examples is using a Soviet SBT-11 geiger counter to upgrade a cheap Chinese FNIRSI GC-01 counter. This is something our buyers do often, so I would like to share the full guide here.
The idea in one sentence: the GC-01 gives you a screen, battery, case, counting electronics, and excellent open-source firmware for very little money — and a Soviet SBT-11-family tube gives it the one thing it lacks, a real detector with a window.

SBT-11 counter.
Why this mod is worth doing
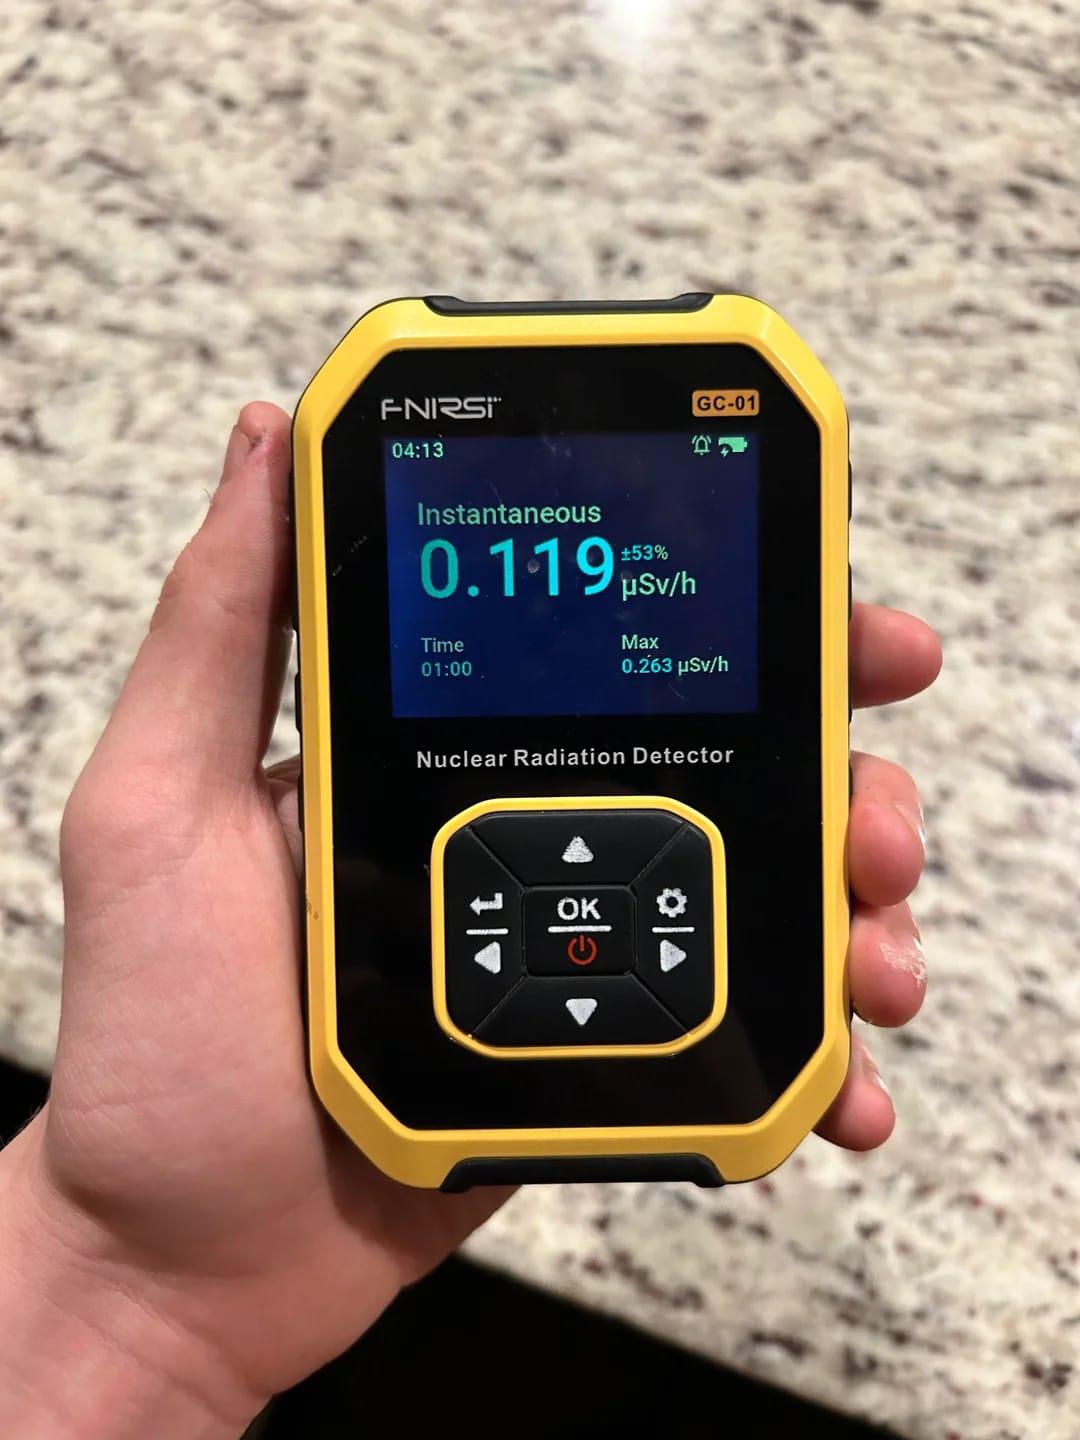
The stock GC-01 uses a small closed glass tube — a J321 (J305 equivalent) in some batches, an M4011 in others — rated for X-rays, gamma, and harder beta (the J321 spec runs from roughly 48 keV to 1.5 MeV). A closed tube inside a plastic case mainly reads gamma and harder beta — alpha and soft beta never reach the detector. That makes the stock device an ambient-dose gadget, not a surface-survey instrument. Dozymetria’s long-term review of the GC-01 comes to the same practical verdict: inexpensive and well made for dose alarming, but with jumpy background readings and no per-pulse click in stock firmware — exactly the gaps that Rad Pro and a better tube fix.
The SBT-11 family changes the job description. These are flat Soviet counter tubes with a thin window on the face. Put that window behind an open grille and the counter starts seeing what a closed case physically cannot: activity sitting on a surface — uranium glass, ore samples, old radium dials, contaminated objects.
About the two names you will see in listings: SBT-11 and SBT-11A are the same tube — a flat four-section Geiger counter with a rectangular mica window, described in Soviet documentation as a soft-beta counter that also registers alpha and gamma. The A is simply the more sensitive grade: tubes that got a thinner mica window were marked with an A, usually stamped on the back, and the thinner window mainly improves alpha response. Externally the two look identical, and the mod is the same for both. The tube sold in our listing is the plain SBT-11.
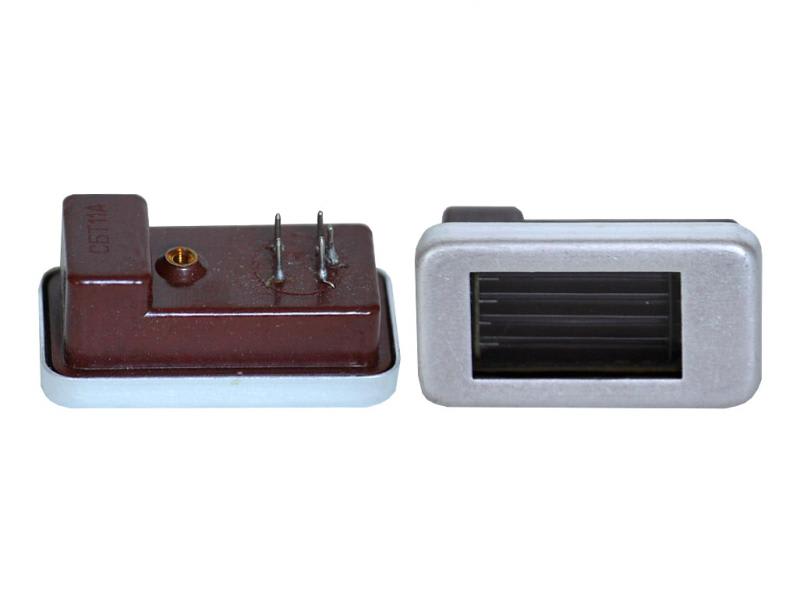
SBT-11A with its mica window. Photo: The Electronic Goldmine.
What you need
- A FNIRSI GC-01. Two hardware versions exist; the better one has the APM32F103RBT6 processor (Geehy) and stores about 72,000 data points under Rad Pro — roughly four years of hourly logging. The version with the CH32F103R8T6 (WCH) works too, but stores only about 5,000 points. You usually cannot tell from the outside; Rad Pro’s install guide has you try the APM32 firmware file first, and if the device reports “Drive full,” yours is the CH32 version.
- An SBT-11 or SBT-11A with an intact window. A cracked or dented window turns the tube into a display piece.
- Basic tools: soldering iron, screwdriver, a way to cut a clean opening in the case, and a multimeter you trust if you plan to verify high voltage.
Step 1: Install Rad Pro
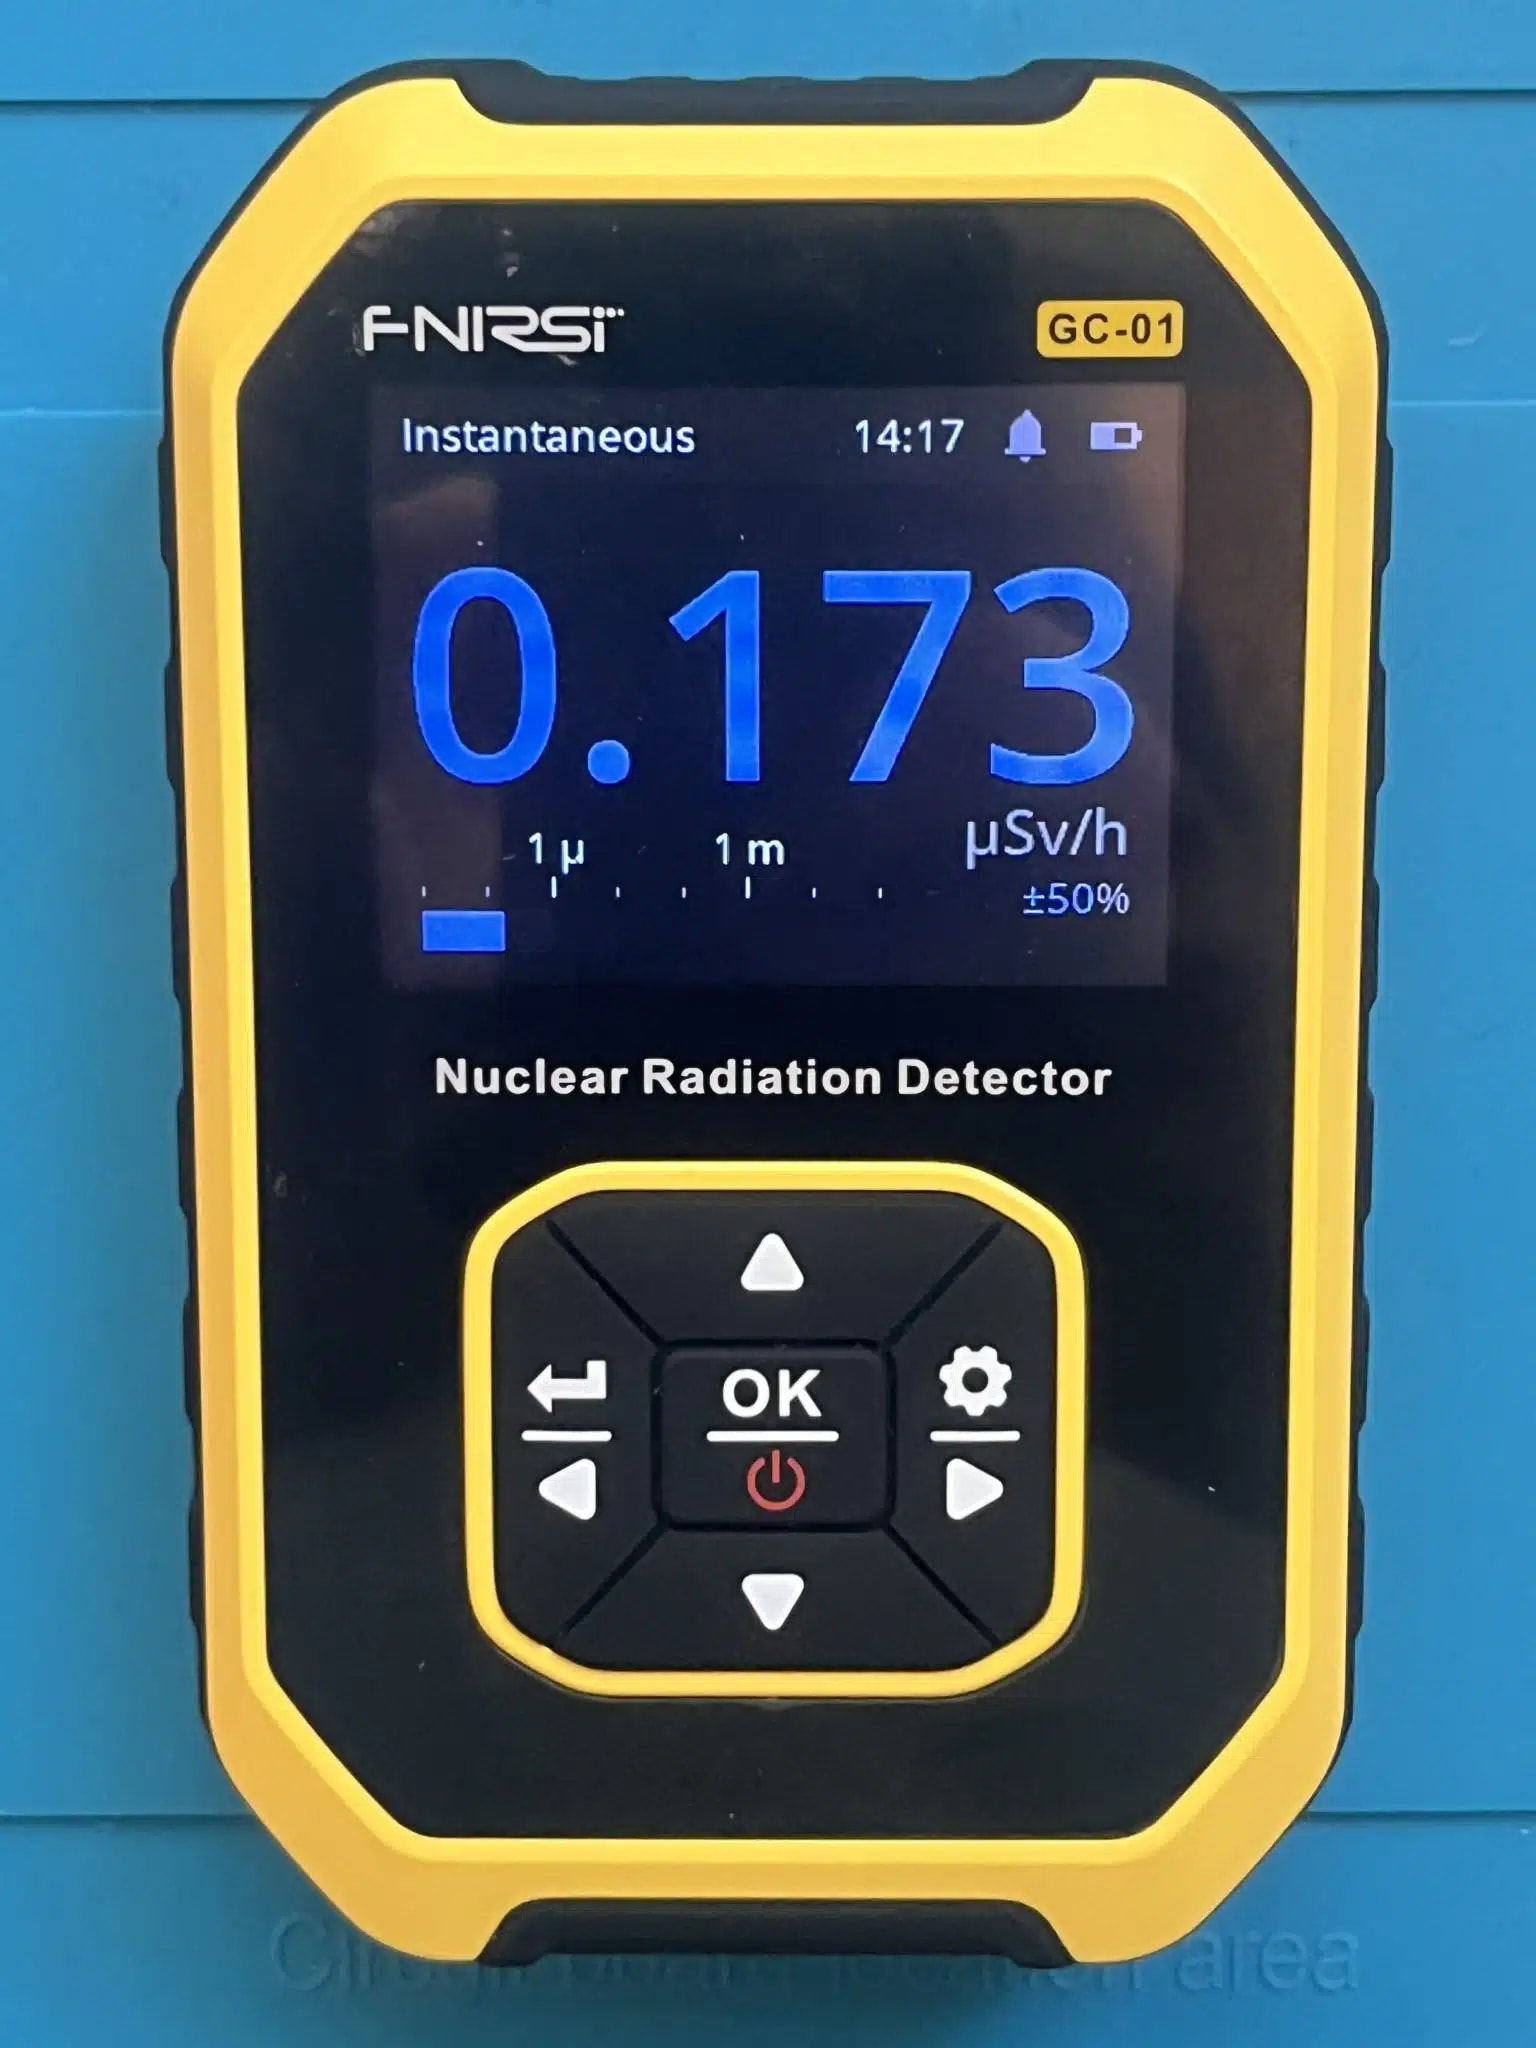
Rad Pro is the open-source firmware that makes this whole project possible. The current release is version 3.1.1, and installation on the GC-01 is genuinely easy: connect the counter over a USB data cable (not a charge-only cable), the device shows up as a USB drive, and you copy the firmware file onto it. The device reboots itself. Note that the developer supports installation from Windows only.
After flashing, the GC-01 gains a lot: proper averaging with confidence intervals, dose logging and export, configurable alerts, history charts — and, critically for this mod, full control over tube settings.
Video: GC-01 and Rad Pro walkthrough by Snow Villiers (Dozymetria). The process is the same for Rad Pro 3.
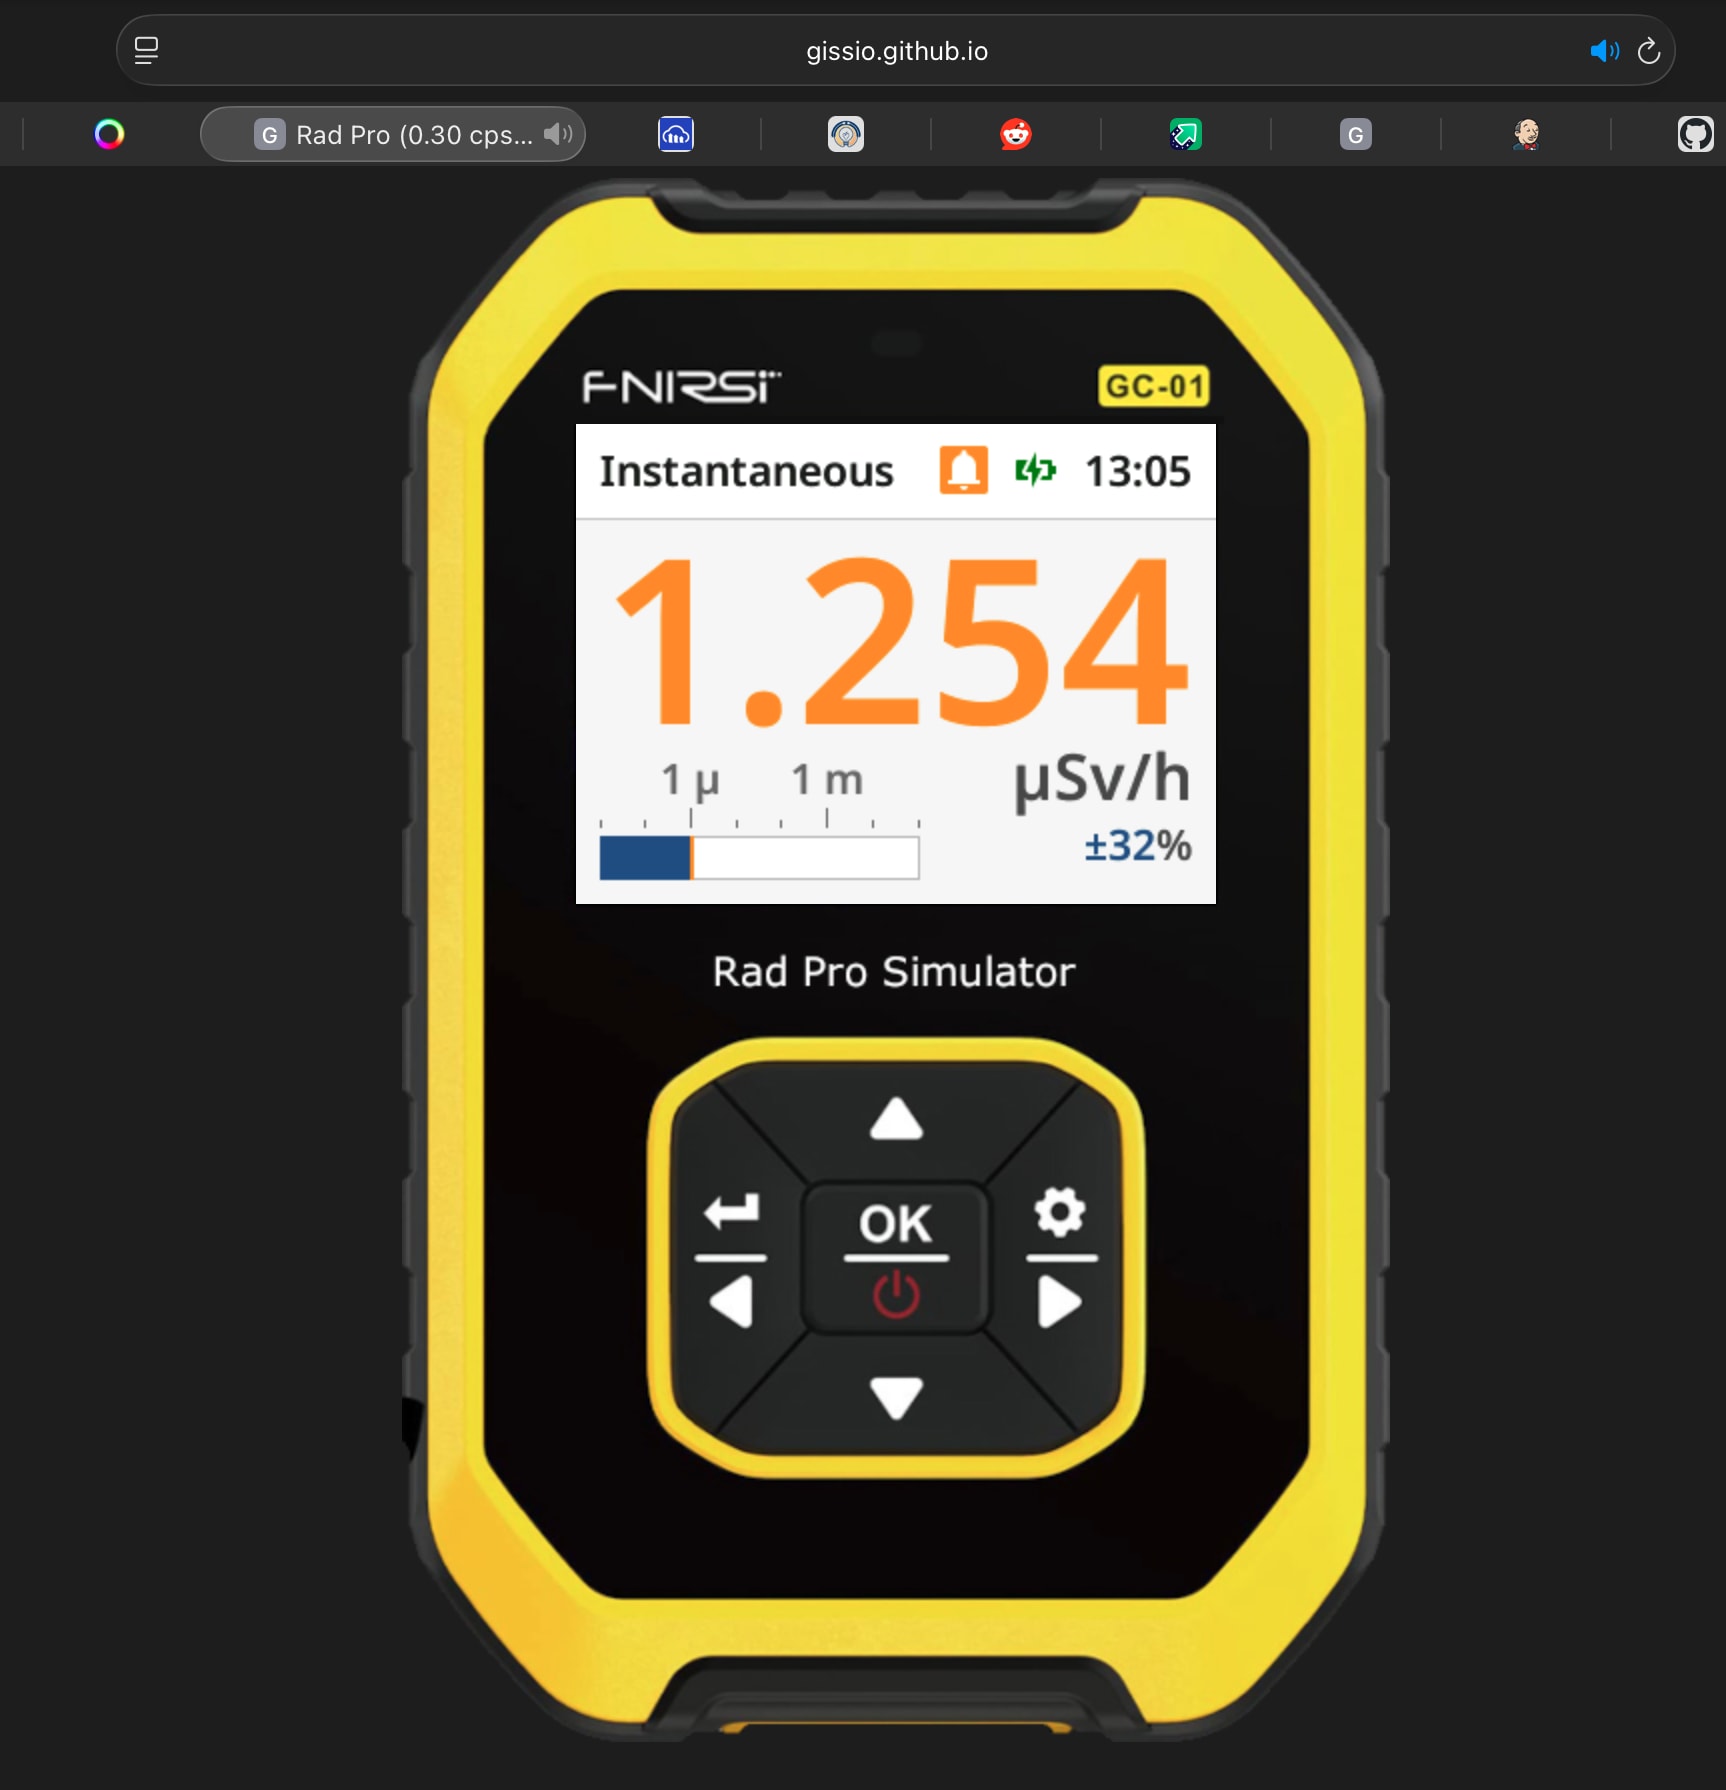
Rad Pro interface in the official simulator. Image: the Rad Pro project.
Step 2: The tube swap
Open the case and desolder the stock glass tube. The SBT-11 is flat — about 29 × 55.5 × 23.5 mm — so it fits a pocket counter, but the case needs an opening so the window faces outward. One tube-specific detail: the SBT-11 has four counting sections with separate pins on the base, usable individually or together — a survey build wants all of them working together.
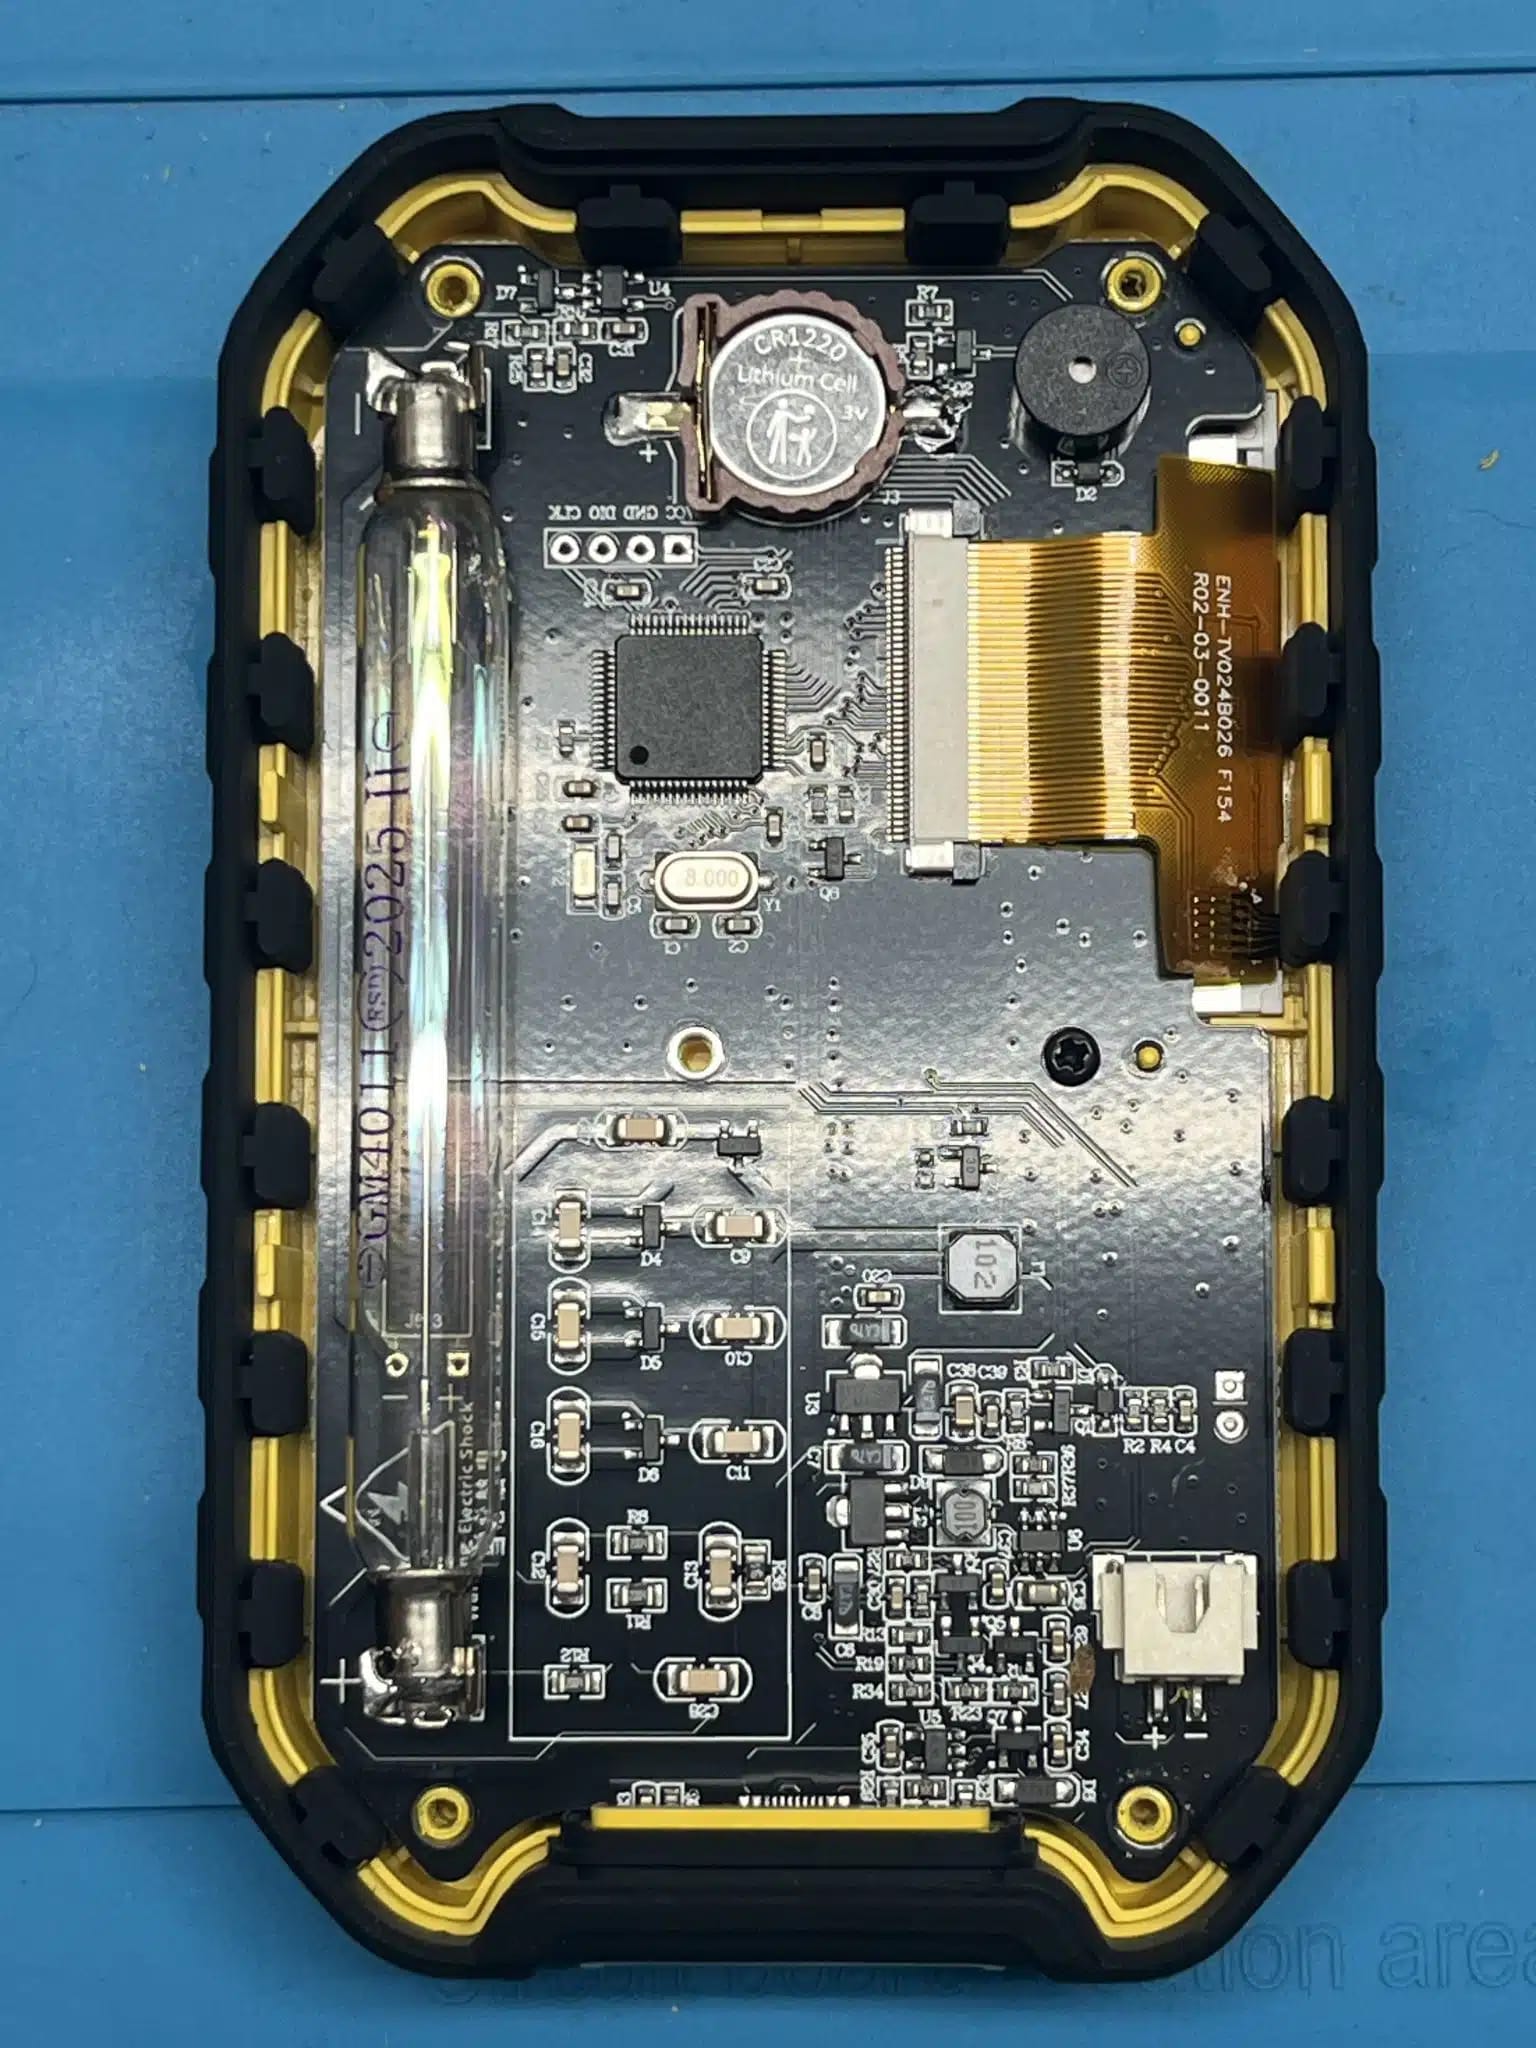
Inside a GC-01: the stock glass tube along the board edge. Photo: Investegate.
This is the part that decides whether the mod was worth doing. The rules:
- The window must face the sample through an open grille, not through plastic, tape, or an acrylic lens. Alpha is stopped by almost anything; soft beta is stopped by thin covers. A window behind solid plastic is just a worse closed tube.
- Recess the window so nothing touches it. Never press on the mica or thin window face.
- Keep the grille and any exposed metal electrically isolated from the tube circuit. The tube runs at several hundred volts; a handheld device must not have user-touchable metal tied to that.
- Solder to the tube leads quickly and cleanly. Treat the tube as the fragile, valuable part and the GC-01 as the replaceable donor.
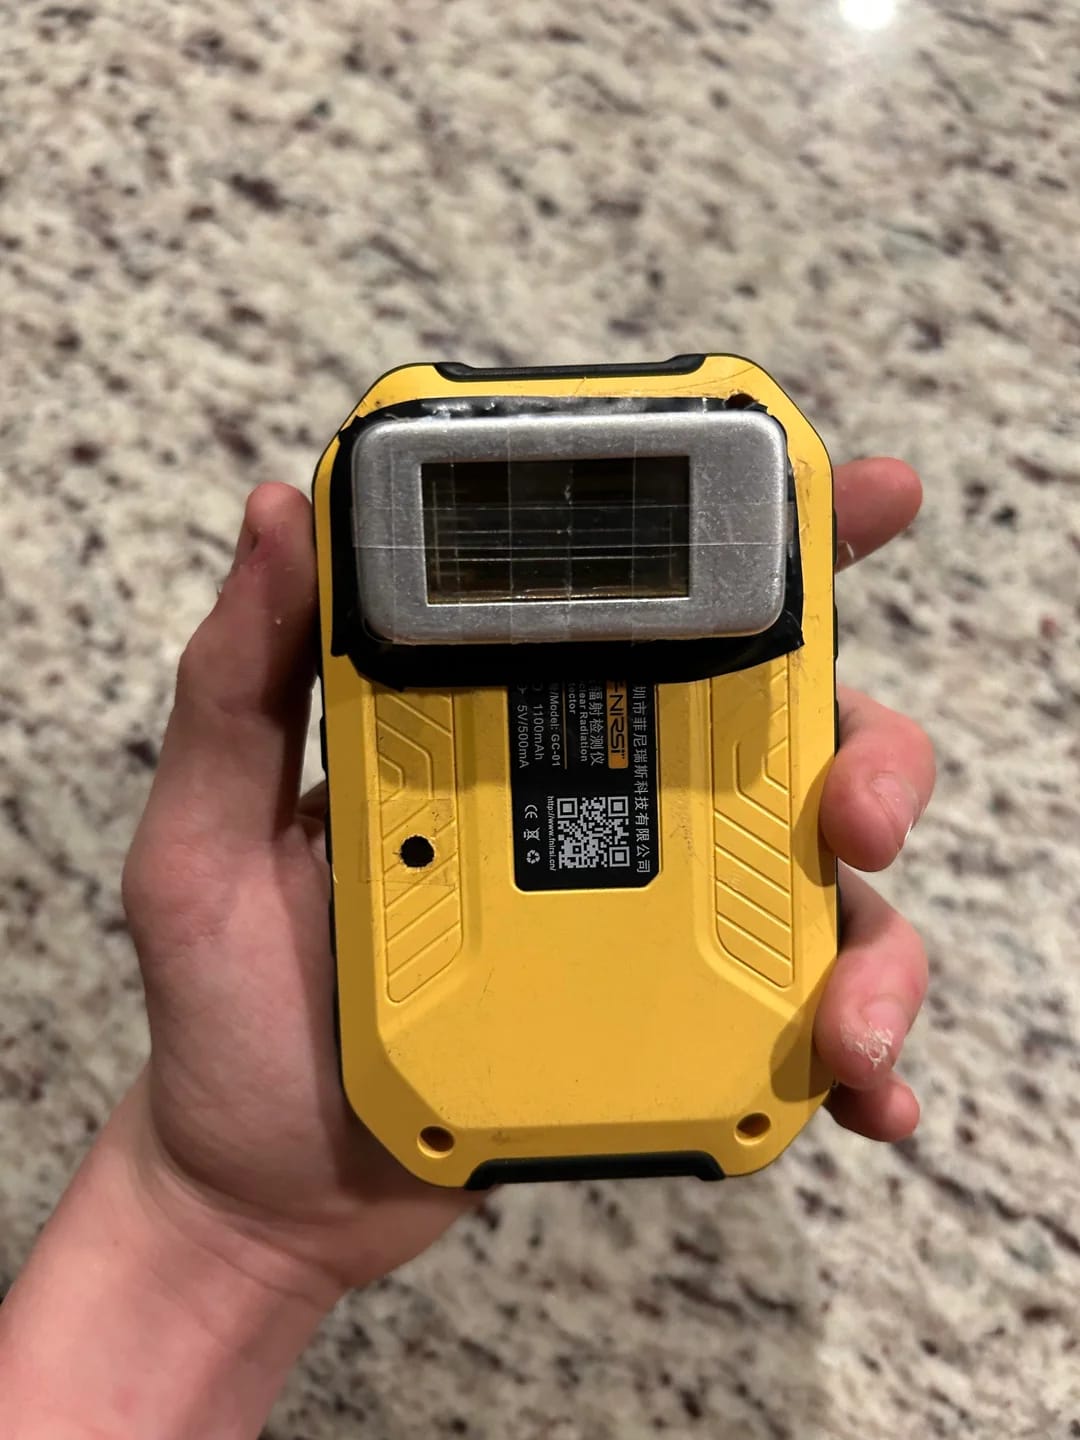
The finished build, back and front. Photo: r/Radiation build thread.
Step 3: Set the tube parameters in Rad Pro
This is where most “tube swap” builds go wrong, and where Rad Pro does it right. Three settings matter.
High voltage. Rad Pro’s recommended HV for the common stock tubes (M4011, J305, J321, SBM-20) is 440 V. Do not blindly keep that number. The SBT-11 datasheet rates both versions for 350–450 V operation (counting starts at 260–320 V, plateau at least 80 V) and quotes the tube’s parameters at 400 V — so the 440 V default technically sits inside the rated range, but high on it. Set a custom HV profile around 400 V, and verify with a proper high-impedance measurement if you can. Rad Pro’s own manual warns that wrong HV settings can damage the tube or the switching transistor.
Sensitivity (conversion factor). Rad Pro has no built-in SBT-11 profile, so the µSv/h display is only as honest as the number you enter. For SBT-11A, radmon.org forum measurements put it at roughly 60% of an LND 7317 pancake; with Rad Pro’s LND 7317 default of 252.6 cpm per µSv/h, that suggests a starting point around 150 cpm/µSv/h — a community estimate, not a calibration. Until you have checked against a known source or a trusted meter, treat CPM as the real reading and the dose rate as an approximation.
Dead time. The SBT-11 datasheet gives 25 µs at 400 V as the starting point, and Rad Pro can measure the real value for you over time under Settings → Statistics. Let it run; it improves accuracy at high count rates.
What you end up with
A pocket counter that finds things. The workflow is simple: window close to the object, watch CPM, move the object away, compare. Uranium glaze, thoriated lens, monazite sand — surface activity that a stock GC-01 barely registers becomes obvious.
A GC-01 running Rad Pro. Photo: Investegate.
Through the mica window the tube sees beta strongly, alpha at close range (the A version more so, thanks to its thinner window), and gamma as well. But a home-built counter is not a calibrated dose meter, and I would not present it as one. If calibrated gamma dose rate from a small handheld is the only goal, a closed SBM-20-style swap is the cleaner project — Investegate documented exactly that build.
The checklist
- Window intact, recessed, behind an open grille.
- Rad Pro installed; firmware variant matched to the processor.
- Custom HV profile set for the actual tube’s documented range, not the 440 V default.
- Sensitivity entered; CPM used for real conclusions until calibrated.
- No exposed metal connected to the tube circuit.
Bottom line
This mod is good engineering with cheap parts: a $30-class counter body, free firmware with a serious feature set, and a Soviet window tube that adds the surface-detection ability the stock tube was simply not designed for.
Thank you for reading!
References used:
- Reddit r/Radiation: GC-01 rebuilt with a Soviet pancake tube
- Rad Pro project README
- Rad Pro FNIRSI GC-01 installation guide (processor versions, flashing)
- Rad Pro reference manual (HV profiles, sensitivity, dead time)
- Snow Villiers: GC-01 v1.5/v1.6 and Rad Pro firmware video
- Dozymetria: long-term FNIRSI GC-01 review (Polish)
- Investegate: FNIRSI GC-01 mod with Rad Pro and SBM-20-1
- Zapadpribor SBT-11 technical data
- Zapadpribor SBT-11A technical data
- Etalonpribor: SBT-11 / SBT-11A description (four sections, mica window, alpha-beta-gamma)
- Istok2: SBT-11A parameters
- GQ Electronics forum: how to tell SBT-11A from SBT-11
- The Electronic Goldmine SBT-11A / CBT-11A listing
- radmon.org forum: SBT-11A sensitivity discussion
